Thursday, May 3, 2012

Red Wine Pickled Ramps


The gift that keeps on giving.  Pickling allows you to eat spring and summer veggies all year round.   Historically pickling is how people survived hard winters.  Lets face facts back then people didn't have supermarkets with produce from Chile, or hydro Tomatoes from New Zealand, they had their crop in the late summer and that's it. They HAD to find a way to preserve there crop so there kids didn't starve.   It's amazing how our ancestors took a necessity and made it an art form.  Even today adults, kids around the world eat pickles everyday but not out of necessity. You can buy fresh cucumbers at any supermarket around the world.  They eat them because they are sweet, sour, spicy and delicious.  They are even super healthy snacks as well.  Stop the bull shit and go get some jars (they come with pickle recipes!), hit a farmers market get your favorite veggies and give it a go.  Here is a real simple recipe for pickled ramps.  Chef Jeff inspired me with his red wine ramps but this has my own twist on it.    


  • 2 cups red wine vinegar
  • 1 cup water
  • 1-1.5 lb ramp bottoms
  • 5-10 piquin peppers
  • 2 tbs salt
  • 2 tbs honey
heat up vinegar and water until steaming then add salt, honey and peppers.  when salt and honey are dissolved, fill jars 3/4 up with ramps and then fill with pickling liquid to the line on the jar.  Let ferment for 2 weeks before enjoying.  

RAMP PESTO


Growing up in my house especially in the summer pesto was always a favorite.  Most of the time it was the traditional genovese style with basil, garlic and pine nuts.

Ramp greens are just as flavorful as the bulbs so there is no reason to waste them.  Simple saute: garlic oil pancetta, or garlic oil anchovies but I'm doing a pesto with sage, parsley and toasted almonds.


  • 3 large bunches of fresh ramp tops
  • 2/3 cup of almond slivers (toasted)
  • 1 buch of fresh parsley with the stems
  • 10-20 sage leaves ( depends how sagey you want it)
  • 1/2 cup Extra Virgin Olive Oil
  • Salt to taste
  • 1/2 cup grated hard Pecorino 
Blanch ramps, parsley, and sage in salted boiling water for 2-3 min then shock in an ice bath.  add to a food processor with almonds and pulse.  Stream in EVOO until all ingredients are incorporated but not completely smooth.  If you have any balls you will grind all of this in a giant mortar and pestle.  Salt to taste.  Now this can be spread on toasted crusty bread topped with burrata, tomatoes, you can dress  pasta with it, put it in pasta like a ravioli or tortellini.  The flavor is like nothing else you can get at the market.


Ahhh Italian comfort food but with a North American twist. Italian food is all about getting the FRESHEST ingredients from dirt to table in the shortest amount of time no matter what part of the world your in.  On Long Island we have Ramps baby.  This is a great quality Rigatoni Napolitana dressed with the ramp pesto,  home made peperoncino and some ridiculous olive oil my family brought back from Puglia.  Dusted with Pecorino Crotonese from my father in law's town in Calabria and boom...spring and passion in a bowl.  

Ramp it up

My first time finding ramps was a mistake. A few years ago  I was walking though a Long Island state park in late March and the trees barley had leaves most of them still just budding.  I've come to love these woods after mushroom hunting there so now I will go for walks all year round.  Ground cover was primarily dead leaves but out of the corner of my eye I notice a huge patch of what looks like giant grass blade patches.  They were beautiful so I took a photo and went on my way.  Later that day after a little due dille I discovered they were ramps and have been harvesting there every year since.


Because of some business in L.A. I worried I may not get the chance this year.  Over the past 7 weeks I've eaten ramps at almost every restaurant we went too, Michelin rated or not so needless to say I am inspired and need an outlet. The morning after I landed was an ugly rainy day but there was no keeping me out of those woods.

It took a while but I finally found a few nice patches between all of the other ground cover.


This is by far my favorite wild edible to eat. Amazingly flavorful when eaten raw. It docent have the spicy bite you would get from raw onion and they are extremely sweet.  You can saute, roast, braise these bad boys but I'm going to pickle most of them.  I love popping a jar of them in the middle of the summer and eating them with some BBQ or a sandwich.  This way I can make them last all year and wont be such a ramp crack head come fall.


Bright green leaves, purple stem and stark white bulbs they are the most STUNNING!   Not to mention at a farmers market the cost three dollars for a small bunch so get off the couch, put down the beer, and get your hiking boots on right now.  They are in there waiting for you but only for another week or so.  Take action!


Monday, January 30, 2012

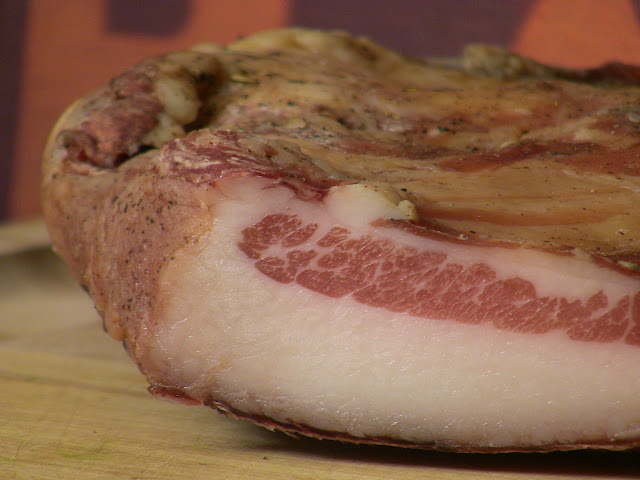
Tamworth Guanciale


Not too long ago I expressed some excitement about making a Carbonara with the pancetta from this pig.  Although I love that pancetta like a brother, guanciale is the traditional main ingredient in this age old pasta dish.   As a matter of fact if you tried to sneak pancetta in the dish with a true Roman at the table chances are they wont even eat it after the first bite.  Before ever eating this hard to find cut, I thought , "what's the diference, they are basically the same right?"  75% fat and the rest meat and skin they both must taste the same.

 You know what they say about assumptions right...this is a totally different animal.  When you bite down on a little sauteed cube of guanciale it bursts a flavor bomb of salty, herb infused pork fat in your mouth with a tender chew of the meat which runs through the center of the jowl.  Pancetta tends to be a bit more on the tough side in my opinion.
 Just so everyone is on the same page this cut originates on the head of the hog. It is essentially its whole cheek from the lip up the jaw line all the way around below the ear and under the eye. That whole piece is cut off and dry cured for 5-7 days depending on how thick the jowl is.  Mine was in the cure for 6 days and I felt it was too salty after the taste test.  I will reduce the cure time by a day next year.  I added black pepper and dried rosemary to the cure but could not really taste the rosemary.  I will stick to using fresh spices next time, traditionally thyme is used.
 If you can get your hands on a jowl, this is one of the easiest ways to start curing meat. for the cure you need 3.5% salt (% of total weight of the meat) 1% black pepper and 1% of whatever spices you like. Rub down the meat and transfer to a zip loc bag with all of the cure mixture.  Let it stay in the fridge for 5-7 business days rubbing and turning every day. When it feels firm take it out rinse in cold water and dry off.  Hang in a cool damp place for 2-4 weeks and your in.

Monday, January 16, 2012

Limonciello Preparation


 Nothing is better than getting a surprise FedEx package from California filled with the most wonderfully perfumed, brilliantly yellow meyer lemons I have ever laid my senses on.  My aunt Jackie who lives in southern California knows how much we love fresh produce and spoils us when her trees are wilting with fruit.  The best way for us to extract and preserve that unique flavor and smell is to make Limonciello.  The zest gets soaked in alcohol which releases all of the essential oils which is what gives the lemon it's essence and color.
 After steeping for 2 weeks I will strain out with cheese cloth, and add a simple syrup or milk infused with sugar.  The first will be the typical clear/ yellowish limonciello, and the other is crema di limone...my favorite.  That's it...serve ice cold out of the freezer.
10 Meyer Lemons
1 Liter of 100 prof vodka
4 Cups of water/ or milk
3 cups of sugar

Tuesday, January 3, 2012

Seafood Terrine's


 This on is a shrimp puree, spinach and shitake mushroom garnish with a salmon inlay.  Both in flavor and visually this terrine is superior in my opinion.


Scallop puree infused with saffron with a jumbo lump crab and chive garnish.  The terrine mold was lined with blanched leek tops.  


  • Red- Roasted pepper and garlic aoli
  • White- cucumber dill sour cream
  • Green- Basil infused homemade mayo


After making so many meat terrines, it is easy to improvise with different meats, garnish and sauces...for meat. Seafood on the other hand is new to me so I followed Michael Ruhlman's recipes from his amazing book Charcuterie.  I encourage anyone who has the balls to buy this book and have a blast.
All three sauces were a hit on either Terrine.  After this project I now feel comfortable working with seafood and I look forward to making up some new conckoctions.

Monday, December 19, 2011

Amish Tamworth Coppa


Out of the whole pig, this is what I look forward to the most.   In Europe the coppa is the most prized cut and I can see why.  On a pig that was naturally raised like this Tamworth from Pleasant Pa
stures in Pa, the fat, to meat ratio is perfectly balanced.  Fresh, it makes for a wonderful roast or braise but if fermented and hung to dry at the right temperature and humidity...well, it's a new animal all together.  Call me crazy but a properly cured seasoned and dried coppa is the most amazing salumi on the hog.  Sorry prosciutto!

You may notice this thing is super long, about 18 inches and its because I had the freedom of choosing where I wanted to cut the muscle.  A 5.5 pound cut like this is not attainable at any supermarket, trust me.  Seam butchery is amazing and will change the way you cook with pork, no doubt.


I can say over the past few years I have made a boat load of successful coppe.  After many experiments with different spice combo's from all over Italy my favorite hands down is the classic calabrese preparation.  It cured for 15 days in kosher salt, cure #2, hot calabrese pepper powder, sweet calabrese pepper from Scott at the Sausage Debauchery.  Washed all the spices and salt with red wine and let it soak for about 15 minutes then pat it dry.  To dry it out I left it in the fridge uncovered overnight then rubbed it with a mix of hot, sweet calabrese powder and black pepper.  I really packed it in and let it hang out on the counter and absorb for about  1/2 hour before stuffing into the beef bung.


Stuffing this monstrosity in a beef bung was not a simple task.  I ripped a hole in the top of the bung but it shouldn't be a problem.  After I tied it up good, i poured the mold solution over it a few times.  It hung in the fermentation chamber until a nice bloom developed, about 5 days.  Let me tell you between the bung and the mold it was...lets say ripe.  


This thing was so thick it should take quite a while to dry.  I expect to wait about 4-6 months but it will be worth it.  I will post some new pictures once it starts drying out and developing the white moldy loveliness!